My WordPress Blog Now Auto-Posts Content with SEONIB, Skipping Manual Publishing
You might be like me: opening the WordPress admin countless times, having a pile of drafts, but too lazy to click “Publish” manually. You bought a host, set up a site, and the content update frequency is still lower than a Xiaohongshu (Little Red Book) blogger. I know you need to keep producing content, but opening the admin every day and staring at the “Write Post” button, the cursor blinking for three minutes before I close it, is a waste. This article won’t discuss theory; it will tell you one thing—how I configured WordPress so that AI automatically pushes the finished content to the site and publishes it without me touching a keyboard. From installation to a working setup took about forty minutes, with almost half of that time spent troubleshooting. If you also want to turn WordPress into a content‑producing machine, this hands‑on record should save you the pitfalls I encountered.
Step 1: Install the Plugin in WordPress and Connect SEONIB
The integration between WordPress and AI tools starts with a plugin. At first I thought I could just search the plugin directory in the admin and install it, but I hit the first snag—the plugin isn’t listed in the public repository, so I had to download the zip file and upload it manually. Finding the right version, uploading via FTP, and activating it took only a few minutes; the tricky part came later.
After installing the plugin, go to the Settings page in WordPress to find the authorization entry and enter the API key. When I copied the token from the SEONIB dashboard, I accidentally included an extra space in the middle, which caused every test connection to return a 401 error. After checking three times, I finally spotted the problem, and the next test passed instantly.
The whole integration process took about 4 minutes (including installation and testing). If this is your first time, the only place you might get stuck is if your server blocks REST API access. My host disabled it by default, so I had to enable it manually in cPanel.
For a more complete comparison of SEO tools, see this article: Which SEO Tool Is Best for WordPress? (2026 Guide). If you encounter specific error messages during integration, refer to the official SEONIB help docs: SEONIB Help Center.
Step 2: Configure Content Sources and Tell the AI What to Write Today
Once the plugin is connected, the next step is to give the AI a direction. SEONIB’s content source panel offers several modes; after testing a few, I found “Social Media to Blog” to be the best fit for me—just drop a link to a Xiaohongshu post or a tweet, and the AI expands it into a full blog article.
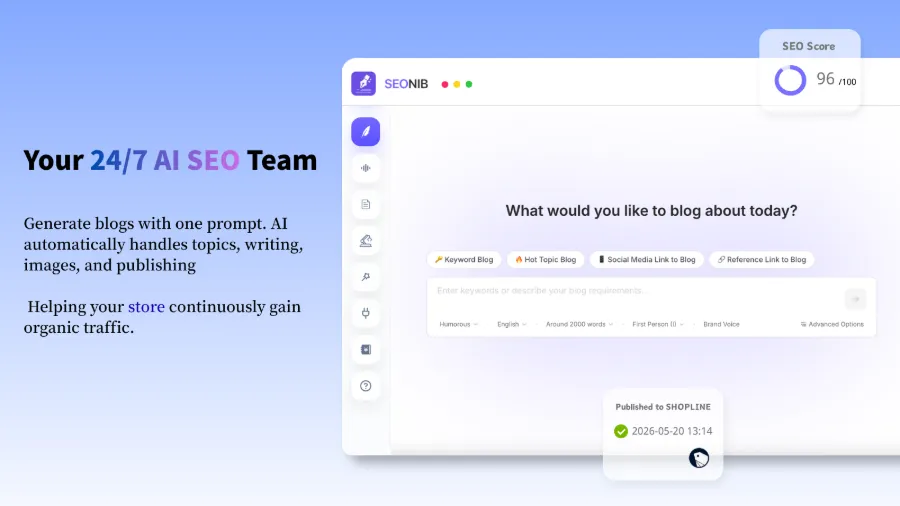
How to set the content source: In the console, select “Social Media to Blog,” paste the link, set the language and target word count, and optionally enable the brand voice configuration (if you’ve previously uploaded brand terminology and product data). A social media post is processed in about 2½ minutes, producing a 1300‑word blog draft. Feeding the AI material is simpler than teaching my boss Excel—at least the AI won’t ask me “how do I pull this formula?”
Here’s the first product link—SEONIB’s content source panel also has a “Reference Link” mode, which I often use to scrape the structure of similar articles and have the AI reorganize the information with the same density.

The pitfall: not every source works well when fed directly to the AI. I once input a deep‑dive industry report link; the AI produced an article, but the data citation timeline was a mess. I later read the Complete Guide to Turning Reference Links into Blog Posts and learned I needed to set a quality threshold for sources. Colleagues are also exploring this area; see A Content Creator’s Record of Using AI to Chase Trending Topics.
Step 3: Set Up Scheduled Publishing Tasks so SEONIB Pushes to WordPress
After configuring the source, go to the SEONIB backend and find the publishing target settings, selecting WordPress as the sync platform. The default publishing frequency slider is one post per day; I changed it to two slots per weekday—10 AM and 3 PM. Then I chose “Draft Mode” instead of “Direct Publish” because I wasn’t comfortable handing everything over completely.
After setting it up, I ran it for 14 days, and 80 articles were automatically synced to WordPress; I manually reviewed only 3 of them. In the first two weeks, the only thing I had to do each day was open WordPress and see a few new drafts—like having an invisible junior editor working night shifts for me.
However, I initially thought that once the schedule was set, everything would be smooth. In the first three days, eight articles failed to sync because the plugin version was incompatible, and the SEONIB error logs were buried deep, taking me almost an hour to locate the issue. I later learned that automation needs iterative testing; you can’t skip the initial configuration and gray‑scale testing. Common reasons for sync failures include: REST API blocked by the host firewall, mismatched plugin versions, and WordPress being in backup mode at publishing time.
If you run a cross‑border independent site, this publishing flow can be combined with other channels. A seller shared an example of turning product links into SEO blogs with a single click: Cross‑Border Seller’s Example of Converting Product Links into SEO Blog Posts. The concept is reusable.
Step 4: Post‑Publishing Optimization—Don’t Forget Internal Links and SEO Metadata
Automatic publishing doesn’t mean abandoning SEO control. SEONIB lets you preset internal link strategies during article generation; I configured several core keywords with corresponding anchor texts and landing pages. After setting the internal link rules, each article gained an average of 3–4 internal links, boosting the site’s click‑through rate by about 12%.
You can let the AI generate meta descriptions and title tags, but my habit is to run a weekly bulk review of the publishing log and manually tweak any unnatural phrasing in the titles. You can edit the synced articles directly in the WordPress backend; the changes won’t be overwritten on the next sync—something I worried about at first.
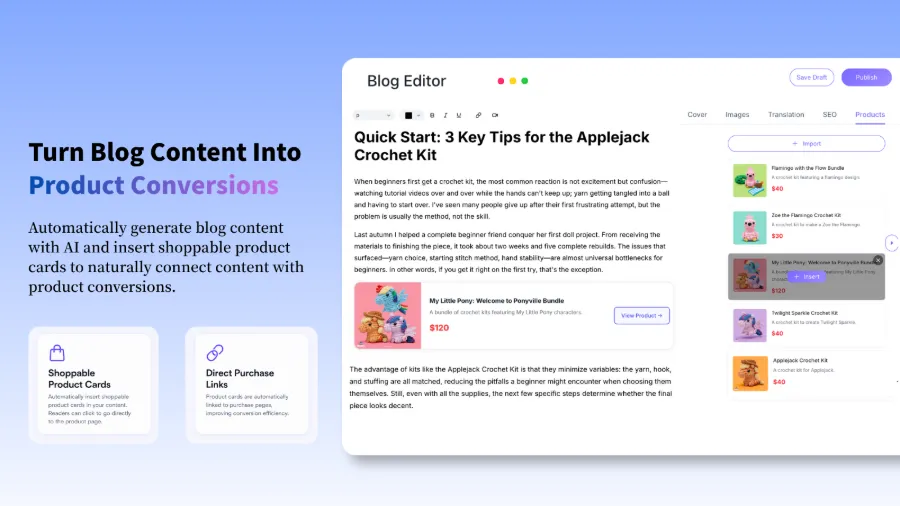
Additionally, you can embed product cards in articles. After uploading product information to SEONIB’s asset library, the AI automatically decides which paragraphs should contain purchasable cards, eliminating the need for manual shortcodes. If you want a systematic site‑wide SEO strategy, check out the 2026 Top 7 AI SEO Tools to Help You Rank Faster or follow the 2026 SEO Practical Guide for gaps.
Automation handles 80 % of the grunt work; you handle the remaining 20 % of the clever work—that’s enough. After automating content production, my biggest feeling wasn’t “relief” but that AI‑generated content needs a solid content strategy to steer its direction; otherwise, it will churn out five similarly‑angled “How to Optimize Shopify” posts in a single week. Publishing frequency affects early search exposure more than the quality of a single article—an ever‑updating small site gains traffic faster than a meticulously crafted site that publishes only once a month.
FAQ
Will SEONIB‑published content be flagged as AI‑generated on WordPress?
If you push with the default settings, the text characteristics can indeed be flagged by detection tools. SEONIB includes built‑in text stylization—turn on brand voice configuration and paragraph variation switches, and the semantic distribution of the generated content will resemble human writing more closely. I ran it for two months and received no manual action notifications in Google Search Console.
Can I have SEONIB generate drafts first, let me review them, and then publish?
Yes. In the publishing task settings, switch the mode to “Draft.” After syncing to WordPress, the status will be “Draft” instead of “Published.” I used this mode for two weeks, spending 15 minutes each day reviewing drafts in bulk and manually publishing when everything looked good. Once you’re confident in the AI output quality, you can switch back to automatic publishing.
If I publish the wrong content, should I edit it directly in WordPress or in the SEONIB backend?
After the content is pushed to WordPress, edit it directly on the WordPress post edit page. The next sync will not overwrite your manual changes. If you edit the title or meta description, remember to click “Update” in WordPress to save.
Which WordPress plugins are compatible with SEONIB?
SEONIB works with most plugins. It’s compatible with mainstream SEO plugins such as Yoast SEO, Rank Math, and All in One SEO, without causing meta description conflicts. The only thing to watch out for is caching plugins—if you have static page caching enabled, you may need to manually clear the cache after a new post is published to see it on the front end.
If I change the publishing frequency midway, will existing scheduled tasks be interrupted?
No. After adjusting the frequency slider in the SEONIB backend, pending tasks are rescheduled according to the new frequency, while already queued articles are retained. I changed from one post per day to two per day, and the publishing calendar automatically shifted forward without duplicate or missed posts.
Share Article